> ## Documentation Index
> Fetch the complete documentation index at: https://docs.opigno.com/llms.txt
> Use this file to discover all available pages before exploring further.
# Access Token Management
> Learn how to create, manage, and revoke access tokens for secure API integrations with Opigno Enterprise
## Overview
Access tokens are the foundation of secure API authentication in Opigno Enterprise. The Access Token Management interface allows administrators to create, monitor, and control API access for external integrations like Zapier.
Each access token is bound to a specific learning area and provides OAuth2-based authentication for API operations within that scope.
## Accessing Token Management
To manage access tokens in your Opigno Enterprise instance:
1. Log into your Opigno Enterprise backoffice as an administrator
2. Locate the **Configuration** section in the left sidebar
3. Click on **Authentication**
4. Select **Manage access tokens**
You'll see a table displaying all existing access tokens with the following information:
* Token name
* Client ID
* Expiration date
* Available actions (revoke, edit)
Only users with administrator privileges can access and manage access tokens. Ensure your account has the necessary permissions before proceeding.
## Understanding the Token List
The Access Tokens page displays all active and expired tokens in your system. For each token, you can view:
### Token Information Displayed
The descriptive label assigned to this token for easy identification.
The unique OAuth2 client identifier used for authentication requests.
The date when this token will expire and can no longer be used for API access.
Available operations for this token, including:
* **Revoke**: Immediately invalidate the token
* **Edit**: Modify token settings (name, expiration)
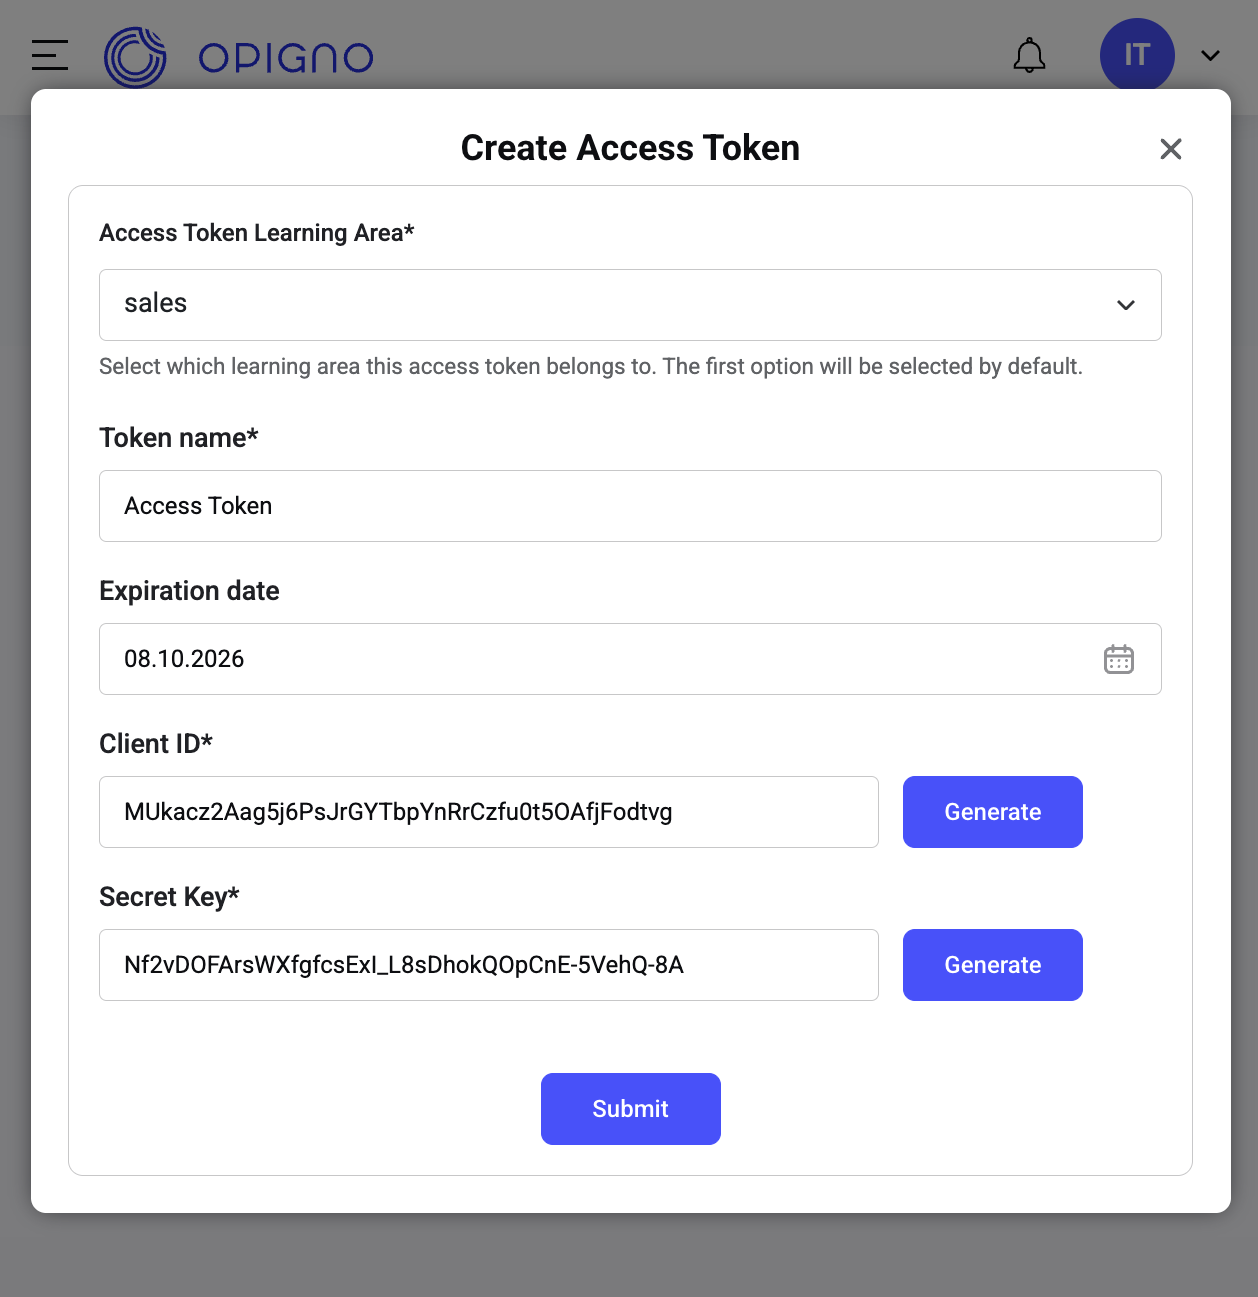 ## Creating a New Access Token
To add a new access token for API integrations:
Click the **Add access token** button at the top of the Access Tokens page.
A modal dialog will appear with the following configuration fields:
### Learning Area Selection
Select the learning area this token will be restricted to. The token will only have access to users, trainings, and data within this specific learning area.
Create separate tokens for each learning area you need to integrate. This provides better security and access control.
### Token Name
Enter a descriptive name to identify the token's purpose. Use clear, meaningful names like:
* "Zapier Integration - Sales Department"
* "HR Management System API"
* "Marketing Automation - Training Sync"
Good naming conventions help you manage multiple tokens effectively, especially when you need to revoke or update them later.
### Expiration Period
Set when the token should expire. The default is one year from the creation date.
Choose an appropriate expiration period based on your organization's security policies. Shorter periods are more secure but require more frequent token rotation.
### OAuth2 Credentials
The system automatically generates a unique Client ID when you create the token. This identifier is used in API authentication requests.
The system generates a secure secret key for this token. This value is shown only once during creation.
**Critical Security Information:**
* The client secret is displayed only once after creation
* Copy and store it immediately in a secure location
* Never share it publicly or commit it to version control
* If lost, you must generate a new token
* The secret is stored as a hash and cannot be retrieved later
1. Review all the configuration settings
2. Click **Submit** to generate the token
3. **Immediately copy the Client ID and Client Secret**
4. Store them securely (password manager, secure vault, etc.)
5. The new token will appear in the tokens list
After submission, verify that your new token appears in the list with the correct name and expiration date.
## Token Security Best Practices
**Always store credentials securely:**
* Use environment variables for production systems
* Store in a password manager or secrets vault
* Never hardcode in application source code
* Keep separate tokens for development and production
**Example secure storage:**
```bash .env theme={null}
OPIGNO_CLIENT_ID=your_client_id_here
OPIGNO_CLIENT_SECRET=your_client_secret_here
OPIGNO_BASE_URL=https://yourcompany.opigno.cloud
```
**Limit token access appropriately:**
* Create separate tokens for each integration
* Assign tokens to specific learning areas only
* Use descriptive names to track usage
* Regularly audit active tokens
**Example naming strategy:**
* Production: `Zapier Prod - Sales Team`
* Staging: `Zapier Staging - Sales Team`
* Development: `Zapier Dev - Testing`
**Implement token rotation policies:**
* Set appropriate expiration dates
* Plan token renewal before expiration
* Revoke unused or old tokens
* Update integrations with new credentials promptly
**Recommended expiration periods:**
* Production environments: 6-12 months
* Development/testing: 3-6 months
* Temporary integrations: 1-3 months
**Track token usage:**
* Regularly review the tokens list
* Monitor expiration dates
* Remove tokens for decommissioned integrations
* Document which systems use which tokens
Set calendar reminders to review tokens quarterly and renew those approaching expiration.
## Managing Existing Tokens
### Revoking a Token
If you need to immediately disable a token:
Find the token you want to revoke in the tokens list.
1. Click the **Revoke** action button for that token
2. Confirm the revocation when prompted
3. The token is immediately invalidated
Revocation is immediate and cannot be undone. Any systems using this token will lose API access immediately.
If the token was actively used, update your integration with a new token to restore functionality.
### When to Revoke Tokens
You should revoke tokens when:
* The token has been compromised or exposed
* The integration is no longer needed
* An employee with access has left the organization
* You're replacing it with a new token
* The learning area assignment needs to change
## Troubleshooting
**Possible causes:**
* Insufficient administrator permissions
* No learning areas available in the system
* System configuration issues
**Solutions:**
1. Verify you're logged in as an administrator
2. Check that at least one learning area exists
3. Contact your system administrator if issues persist
**Problem:** The client secret was not saved during token creation.
**Solution:**
The secret cannot be retrieved after the creation dialog closes. You must:
1. Revoke the existing token
2. Create a new token
3. Immediately copy and securely store the new credentials
**Problem:** API requests fail with authentication errors.
**Solution:**
1. Check the expiration date in the tokens list
2. Create a new token with the same learning area
3. Update your integration with the new credentials
4. Revoke the old expired token
**Problem:** Token doesn't have access to needed resources.
**Solution:**
Learning area assignments cannot be changed after creation. You must:
1. Create a new token with the correct learning area
2. Update your integration to use the new token
3. Revoke the old token
This security design ensures clear audit trails and prevents accidental privilege escalation.
## Next Steps
Ready to proceed? Start here:
Step-by-step guide to configuring your access tokens in Zapier.
Complete guide to configuring Zapier authentication with your access tokens.
## Creating a New Access Token
To add a new access token for API integrations:
Click the **Add access token** button at the top of the Access Tokens page.
A modal dialog will appear with the following configuration fields:
### Learning Area Selection
Select the learning area this token will be restricted to. The token will only have access to users, trainings, and data within this specific learning area.
Create separate tokens for each learning area you need to integrate. This provides better security and access control.
### Token Name
Enter a descriptive name to identify the token's purpose. Use clear, meaningful names like:
* "Zapier Integration - Sales Department"
* "HR Management System API"
* "Marketing Automation - Training Sync"
Good naming conventions help you manage multiple tokens effectively, especially when you need to revoke or update them later.
### Expiration Period
Set when the token should expire. The default is one year from the creation date.
Choose an appropriate expiration period based on your organization's security policies. Shorter periods are more secure but require more frequent token rotation.
### OAuth2 Credentials
The system automatically generates a unique Client ID when you create the token. This identifier is used in API authentication requests.
The system generates a secure secret key for this token. This value is shown only once during creation.
**Critical Security Information:**
* The client secret is displayed only once after creation
* Copy and store it immediately in a secure location
* Never share it publicly or commit it to version control
* If lost, you must generate a new token
* The secret is stored as a hash and cannot be retrieved later
1. Review all the configuration settings
2. Click **Submit** to generate the token
3. **Immediately copy the Client ID and Client Secret**
4. Store them securely (password manager, secure vault, etc.)
5. The new token will appear in the tokens list
After submission, verify that your new token appears in the list with the correct name and expiration date.
## Token Security Best Practices
**Always store credentials securely:**
* Use environment variables for production systems
* Store in a password manager or secrets vault
* Never hardcode in application source code
* Keep separate tokens for development and production
**Example secure storage:**
```bash .env theme={null}
OPIGNO_CLIENT_ID=your_client_id_here
OPIGNO_CLIENT_SECRET=your_client_secret_here
OPIGNO_BASE_URL=https://yourcompany.opigno.cloud
```
**Limit token access appropriately:**
* Create separate tokens for each integration
* Assign tokens to specific learning areas only
* Use descriptive names to track usage
* Regularly audit active tokens
**Example naming strategy:**
* Production: `Zapier Prod - Sales Team`
* Staging: `Zapier Staging - Sales Team`
* Development: `Zapier Dev - Testing`
**Implement token rotation policies:**
* Set appropriate expiration dates
* Plan token renewal before expiration
* Revoke unused or old tokens
* Update integrations with new credentials promptly
**Recommended expiration periods:**
* Production environments: 6-12 months
* Development/testing: 3-6 months
* Temporary integrations: 1-3 months
**Track token usage:**
* Regularly review the tokens list
* Monitor expiration dates
* Remove tokens for decommissioned integrations
* Document which systems use which tokens
Set calendar reminders to review tokens quarterly and renew those approaching expiration.
## Managing Existing Tokens
### Revoking a Token
If you need to immediately disable a token:
Find the token you want to revoke in the tokens list.
1. Click the **Revoke** action button for that token
2. Confirm the revocation when prompted
3. The token is immediately invalidated
Revocation is immediate and cannot be undone. Any systems using this token will lose API access immediately.
If the token was actively used, update your integration with a new token to restore functionality.
### When to Revoke Tokens
You should revoke tokens when:
* The token has been compromised or exposed
* The integration is no longer needed
* An employee with access has left the organization
* You're replacing it with a new token
* The learning area assignment needs to change
## Troubleshooting
**Possible causes:**
* Insufficient administrator permissions
* No learning areas available in the system
* System configuration issues
**Solutions:**
1. Verify you're logged in as an administrator
2. Check that at least one learning area exists
3. Contact your system administrator if issues persist
**Problem:** The client secret was not saved during token creation.
**Solution:**
The secret cannot be retrieved after the creation dialog closes. You must:
1. Revoke the existing token
2. Create a new token
3. Immediately copy and securely store the new credentials
**Problem:** API requests fail with authentication errors.
**Solution:**
1. Check the expiration date in the tokens list
2. Create a new token with the same learning area
3. Update your integration with the new credentials
4. Revoke the old expired token
**Problem:** Token doesn't have access to needed resources.
**Solution:**
Learning area assignments cannot be changed after creation. You must:
1. Create a new token with the correct learning area
2. Update your integration to use the new token
3. Revoke the old token
This security design ensures clear audit trails and prevents accidental privilege escalation.
## Next Steps
Ready to proceed? Start here:
Step-by-step guide to configuring your access tokens in Zapier.
Complete guide to configuring Zapier authentication with your access tokens.