> ## Documentation Index
> Fetch the complete documentation index at: https://docs.opigno.com/llms.txt
> Use this file to discover all available pages before exploring further.
# Authentication Setup
> Complete guide to configuring authentication for Zapier integration with Opigno Enterprise LIP
## Prerequisites
Before setting up authentication, ensure you have:
* Administrator access to your Opigno Enterprise instance
* At least one hierarchy top level created in your instance
* Understanding of your learning area structure
Only administrator users can create access tokens. Ensure your account has sufficient permissions before proceeding.
## Generating Access Tokens
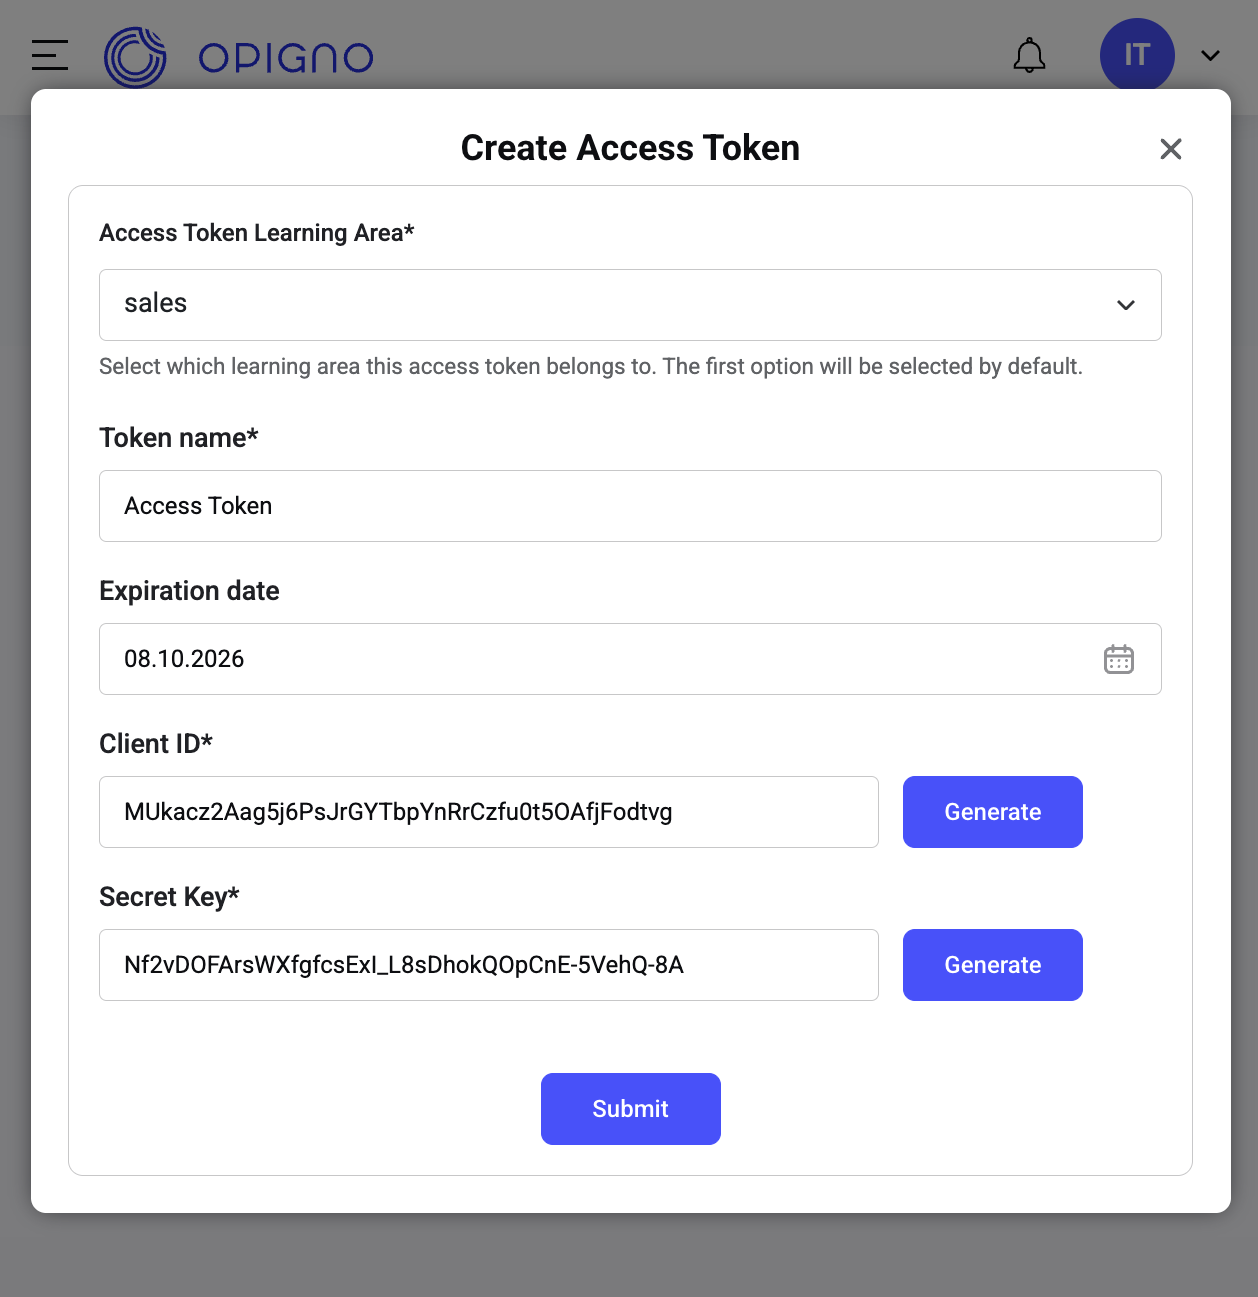
To connect Zapier to your Opigno Enterprise instance, you need to generate an access token first.
1. Log into your Opigno Enterprise backoffice
2. Go to the **Authentication** section in the left sidebar
3. Click **Manage access tokens**
1. Click the **Add access token** button
2. Fill out the token configuration form (see details below)
3. Save your credentials securely
## Token Configuration Fields
When creating a new access token, you'll need to configure several important fields:
### Access Token Learning Area
The learning area this token will be restricted to. Each token is typically limited to a single learning area for security purposes.
You'll need to create a separate token for each learning area you want to integrate with Zapier. Learn more about [understanding learning areas](/hierarchy-management/understanding-learning-areas).
### Token Name
A human-readable label to identify this token. Use descriptive names like "Zapier Integration - Sales Team" or "Marketing Automation Token".
### Expiration Date
The token's expiration date. Default is set to 1 year, but you can adjust this based on your internal security policies.
Set appropriate expiration dates based on your security requirements. Shorter expiration periods provide better security but require more frequent token renewal.
### Client ID and Secret Key
The OAuth2 client ID for your application. This unique identifier is generated when you create the access token.
The OAuth2 client secret for your application. This is a sensitive credential that must be kept secure.
Never share your client secret publicly or commit it to version control. Treat it like a password. The secret is only shown once during creation.
 ## Zapier Configuration
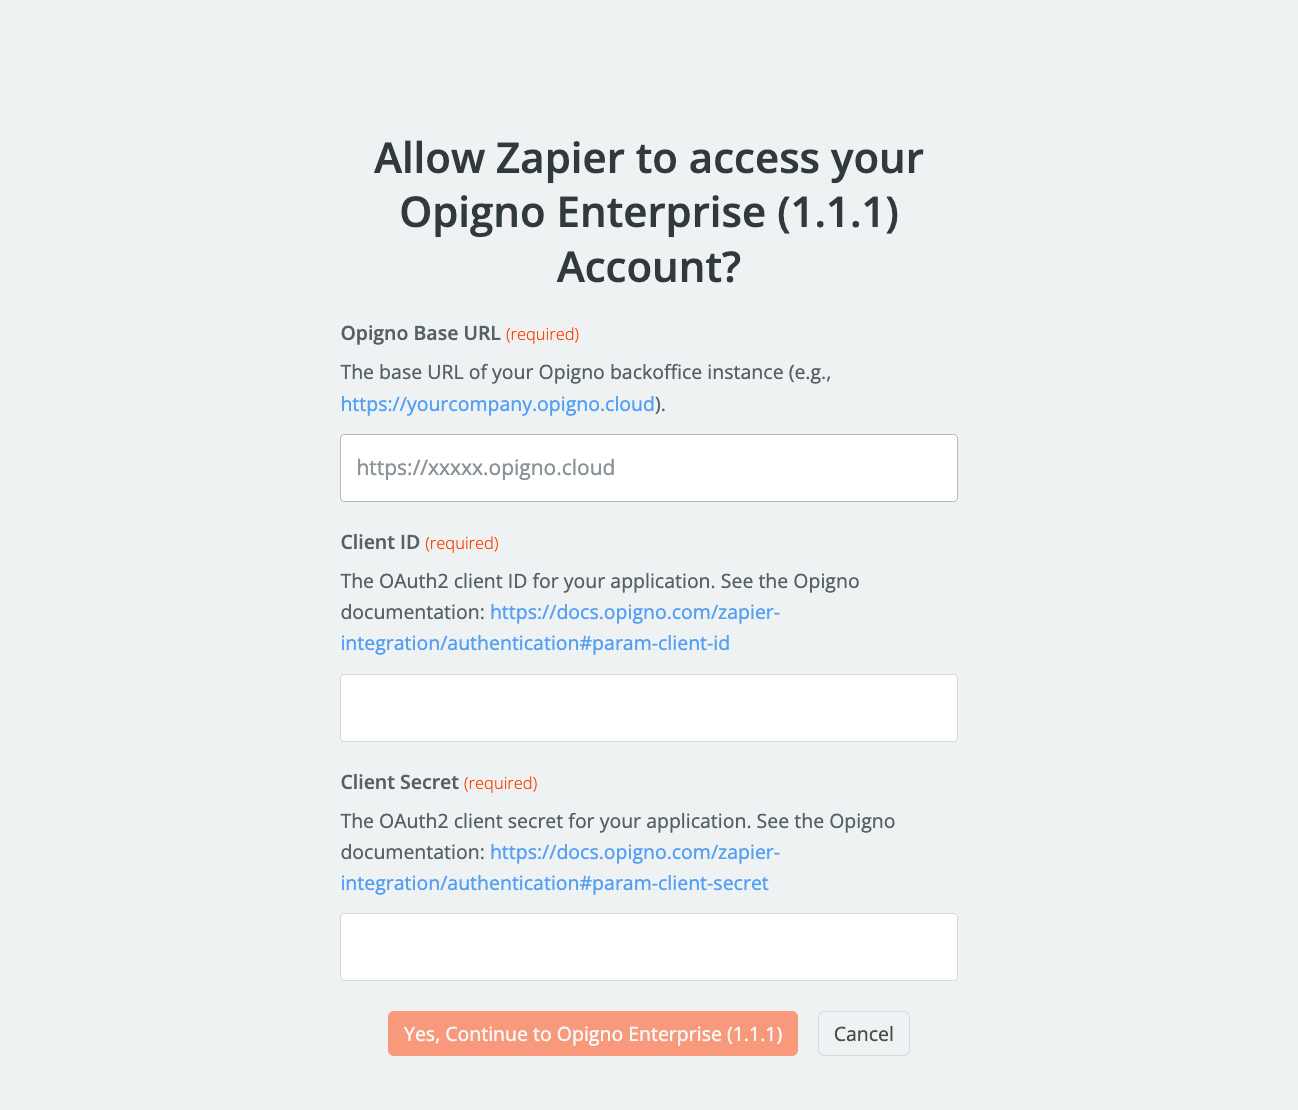
Once you have your access token credentials, configure Zapier to connect to your Opigno Enterprise instance.
### Required Configuration Fields
Configure these fields in your Zapier integration:
The base URL of your Opigno backoffice instance. This is the main domain where your Opigno application is hosted.
**Format**: `https://yourcompany.opigno.cloud` or `https://yourdomain.com`
Make sure to use the exact URL format without trailing slashes or additional paths.
The OAuth2 client ID for your application. This unique identifier is generated when you create an access token in your Opigno instance.
**Where to find**:
1. Navigate to your Opigno backoffice
2. Go to **Configuration** → **Authentication** → **Manage access tokens**
3. Click **+ Add access token**
4. Copy the generated Client ID
The OAuth2 client secret for your application. This is a sensitive credential that must be kept secure.
Never share your client secret publicly or commit it to version control. Treat it like a password. The secret is only shown once during creation.
**Where to find**: The secret key is available only immediately after token creation and is stored as a hash for validation. If you lose it, you'll need to generate a new token.
## Zapier Configuration
Once you have your access token credentials, configure Zapier to connect to your Opigno Enterprise instance.
### Required Configuration Fields
Configure these fields in your Zapier integration:
The base URL of your Opigno backoffice instance. This is the main domain where your Opigno application is hosted.
**Format**: `https://yourcompany.opigno.cloud` or `https://yourdomain.com`
Make sure to use the exact URL format without trailing slashes or additional paths.
The OAuth2 client ID for your application. This unique identifier is generated when you create an access token in your Opigno instance.
**Where to find**:
1. Navigate to your Opigno backoffice
2. Go to **Configuration** → **Authentication** → **Manage access tokens**
3. Click **+ Add access token**
4. Copy the generated Client ID
The OAuth2 client secret for your application. This is a sensitive credential that must be kept secure.
Never share your client secret publicly or commit it to version control. Treat it like a password. The secret is only shown once during creation.
**Where to find**: The secret key is available only immediately after token creation and is stored as a hash for validation. If you lose it, you'll need to generate a new token.
 ## Testing Your Connection
After configuring all fields, test your connection to ensure everything is working correctly:
1. Enter all required fields in Zapier
2. Click **Save** to store your configuration
1. Click **Test** to verify the connection
2. Check for any error messages
3. Verify you can access your learning area data
If the test is successful, you'll see a confirmation message and can proceed to configure your Zapier workflows.
## Next Steps
Once authentication is configured successfully:
Learn how to configure user access and permissions within your learning areas.
Understand how to set up and manage your organizational hierarchy.
## Testing Your Connection
After configuring all fields, test your connection to ensure everything is working correctly:
1. Enter all required fields in Zapier
2. Click **Save** to store your configuration
1. Click **Test** to verify the connection
2. Check for any error messages
3. Verify you can access your learning area data
If the test is successful, you'll see a confirmation message and can proceed to configure your Zapier workflows.
## Next Steps
Once authentication is configured successfully:
Learn how to configure user access and permissions within your learning areas.
Understand how to set up and manage your organizational hierarchy.